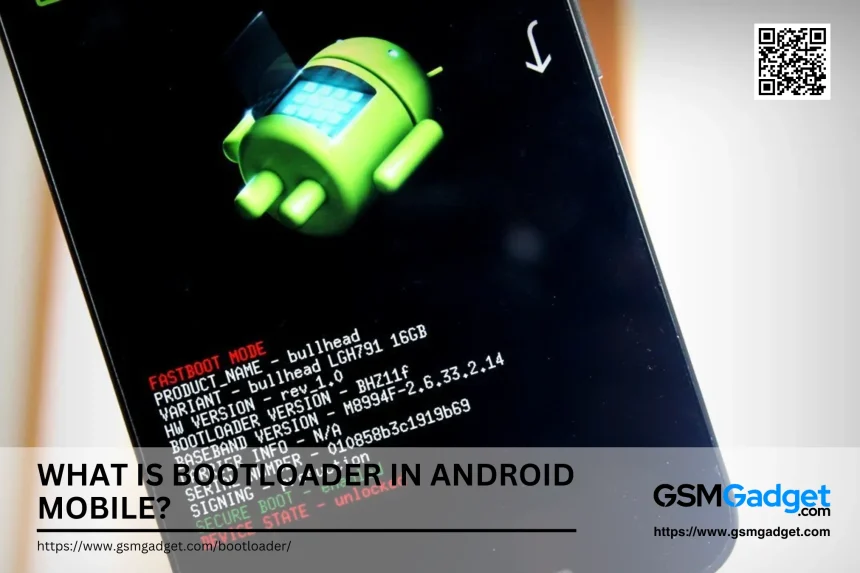
When you power on your Android device, the first piece of software that springs to life is the bootloader. Acting as the essential bridge between the hardware and the Android operating system, the bootloader ensures that all necessary components are loaded to kickstart your device. Much like the BIOS on a computer, the bootloader verifies and loads the kernel, making it indispensable to the device’s functioning. However, it’s more than just a start-up facilitator.
The bootloader is a program that initializes the system during startup. It loads the operating system kernel and essential components, ensuring the device boots correctly. Manufacturers often lock the bootloader to maintain system integrity and security, preventing unauthorized modifications. However, unlocking the bootloader allows users to install custom firmware or gain root access, enabling advanced customization. This process can void warranties and may expose the device to security risks.
The Origin and Evolution of Bootloaders
The concept of the bootloader has evolved alongside advancements in mobile technology, originating from early computer systems where similar processes were used to initialize hardware. In early mobile devices, especially before the smartphone era, manufacturers relied on dedicated ports and specialized equipment to flash system updates or repair corrupted firmware, a time-consuming and complex process. With the rise of Android, the bootloader became an integral, standardized feature, enabling the device to manage system loads and secure boot processes with minimal manual intervention. As mobile devices grew more advanced, so did bootloaders, incorporating security features such as Verified Boot and integrating with Trusted Execution Environments (TEE) to guard against unauthorized access. Today’s bootloaders are engineered to not only start the operating system but also to provide enhanced control over system security, while also allowing tech-savvy users an option to unlock them for greater customization. This evolution marks the bootloader’s journey from a simple start-up tool to a sophisticated gatekeeper of both functionality and security.
Requirements for Unlocking the Bootloader on an Android Device
Here are the steps and tools you need before starting:
- Enable Developer Options: Access Developer Options by tapping “Build Number” in settings to unlock essential bootloader settings.
- Activate OEM Unlocking: Enable OEM Unlocking in Developer Options to allow the bootloader unlocking process.
- Back Up Your Data: Securely back up all data as unlocking will erase everything on your device.
- Install Android SDK and ADB/Fastboot Tools: Install command-line tools to communicate with your device for unlocking.
- Charge Your Device: Ensure your device is fully charged to prevent issues during the unlocking process.
- Obtain Any Necessary Unlock Codes: Some manufacturers require a unique unlock code available from their website.
- Verify Compatibility with Your Device Model: Confirm your device supports bootloader unlocking to avoid errors or device bricking.
- Understand the Risks and Implications: Be aware that unlocking may void warranties, reduce security, and affect app compatibility.
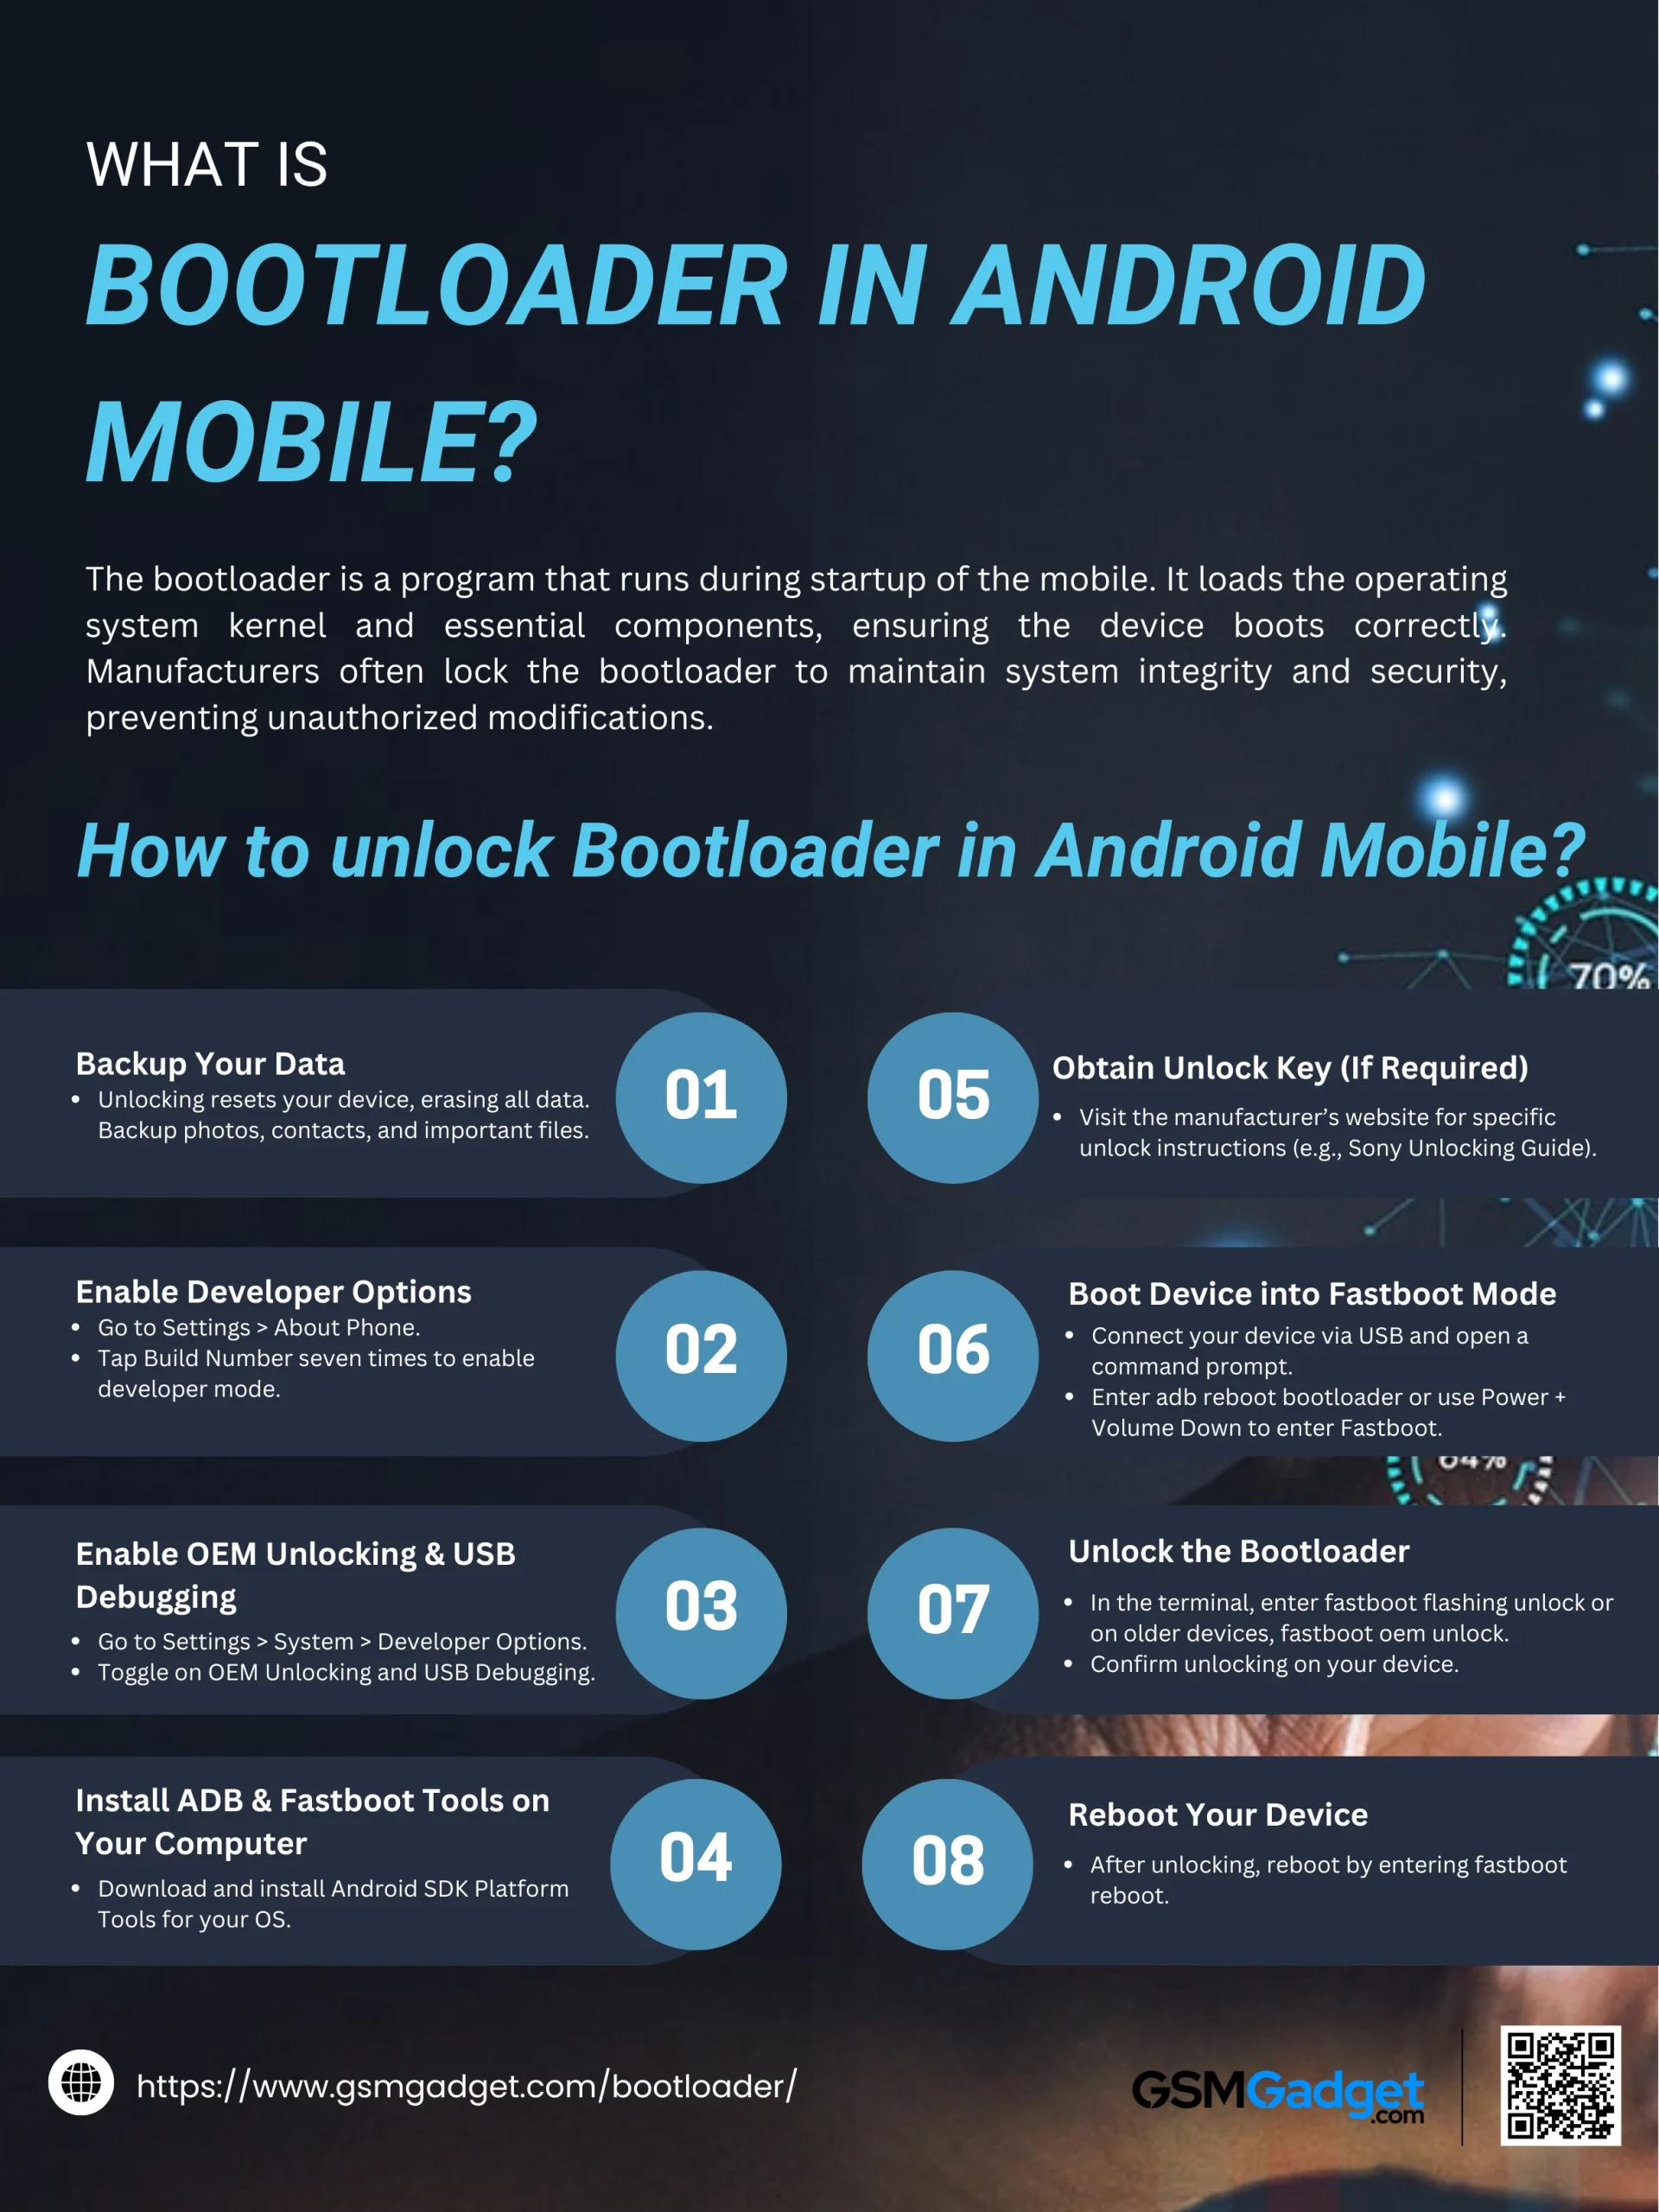
 How to unlock Bootloader in Android Mobile?
Unlocking the bootloader on your Android device allows you to install custom firmware, gain root access, and perform other advanced modifications. However, this process can void your warranty, erase all data on your device, and may lead to security vulnerabilities. Proceed with caution and ensure you have backed up all important data before continuing.
General Steps to Unlock the Bootloader:
- Backup Your Data: Unlocking the bootloader will perform a factory reset, erasing all user data. Ensure you back up photos, contacts, and other important information.
- Enable Developer Options:
- Go to Settings > About Phone.
- Tap on Build Number seven times until you see a message indicating you are now a developer.
- Enable OEM Unlocking and USB Debugging:
- Return to Settings > System > Developer Options.
- Toggle on OEM Unlocking.
- Toggle on USB Debugging.
- Install ADB and Fastboot Tools on Your Computer:
- Download and install the Android SDK Platform Tools suitable for your operating system.
- Obtain Device-Specific Unlock Key (If Required): Some manufacturers require you to obtain an unlock key. Visit your device manufacturer’s official website for instructions. For example:
- Boot Your Device into Fastboot Mode:
- Connect your device to your computer via USB.
- Open a command prompt or terminal window.
- Enter the following command:
-
-
- Copy code
- adb reboot bootloader
-
-
- Alternatively, power off your device and use the specific button combination (commonly Power + Volume Down) to enter Fastboot mode.
- Unlock the Bootloader:
- In the command prompt or terminal, enter:
-
-
- Copy code
- fastboot flashing unlock
-
Note: On older devices, the command might be:
-
-
- Copy code
- fastboot oem unlock
-
-
- Confirm the bootloader unlocking on your device when prompted.
- Reboot Your Device:
- After the process completes, reboot your device by entering:
-
-
- Copy code
- fastboot reboot
-
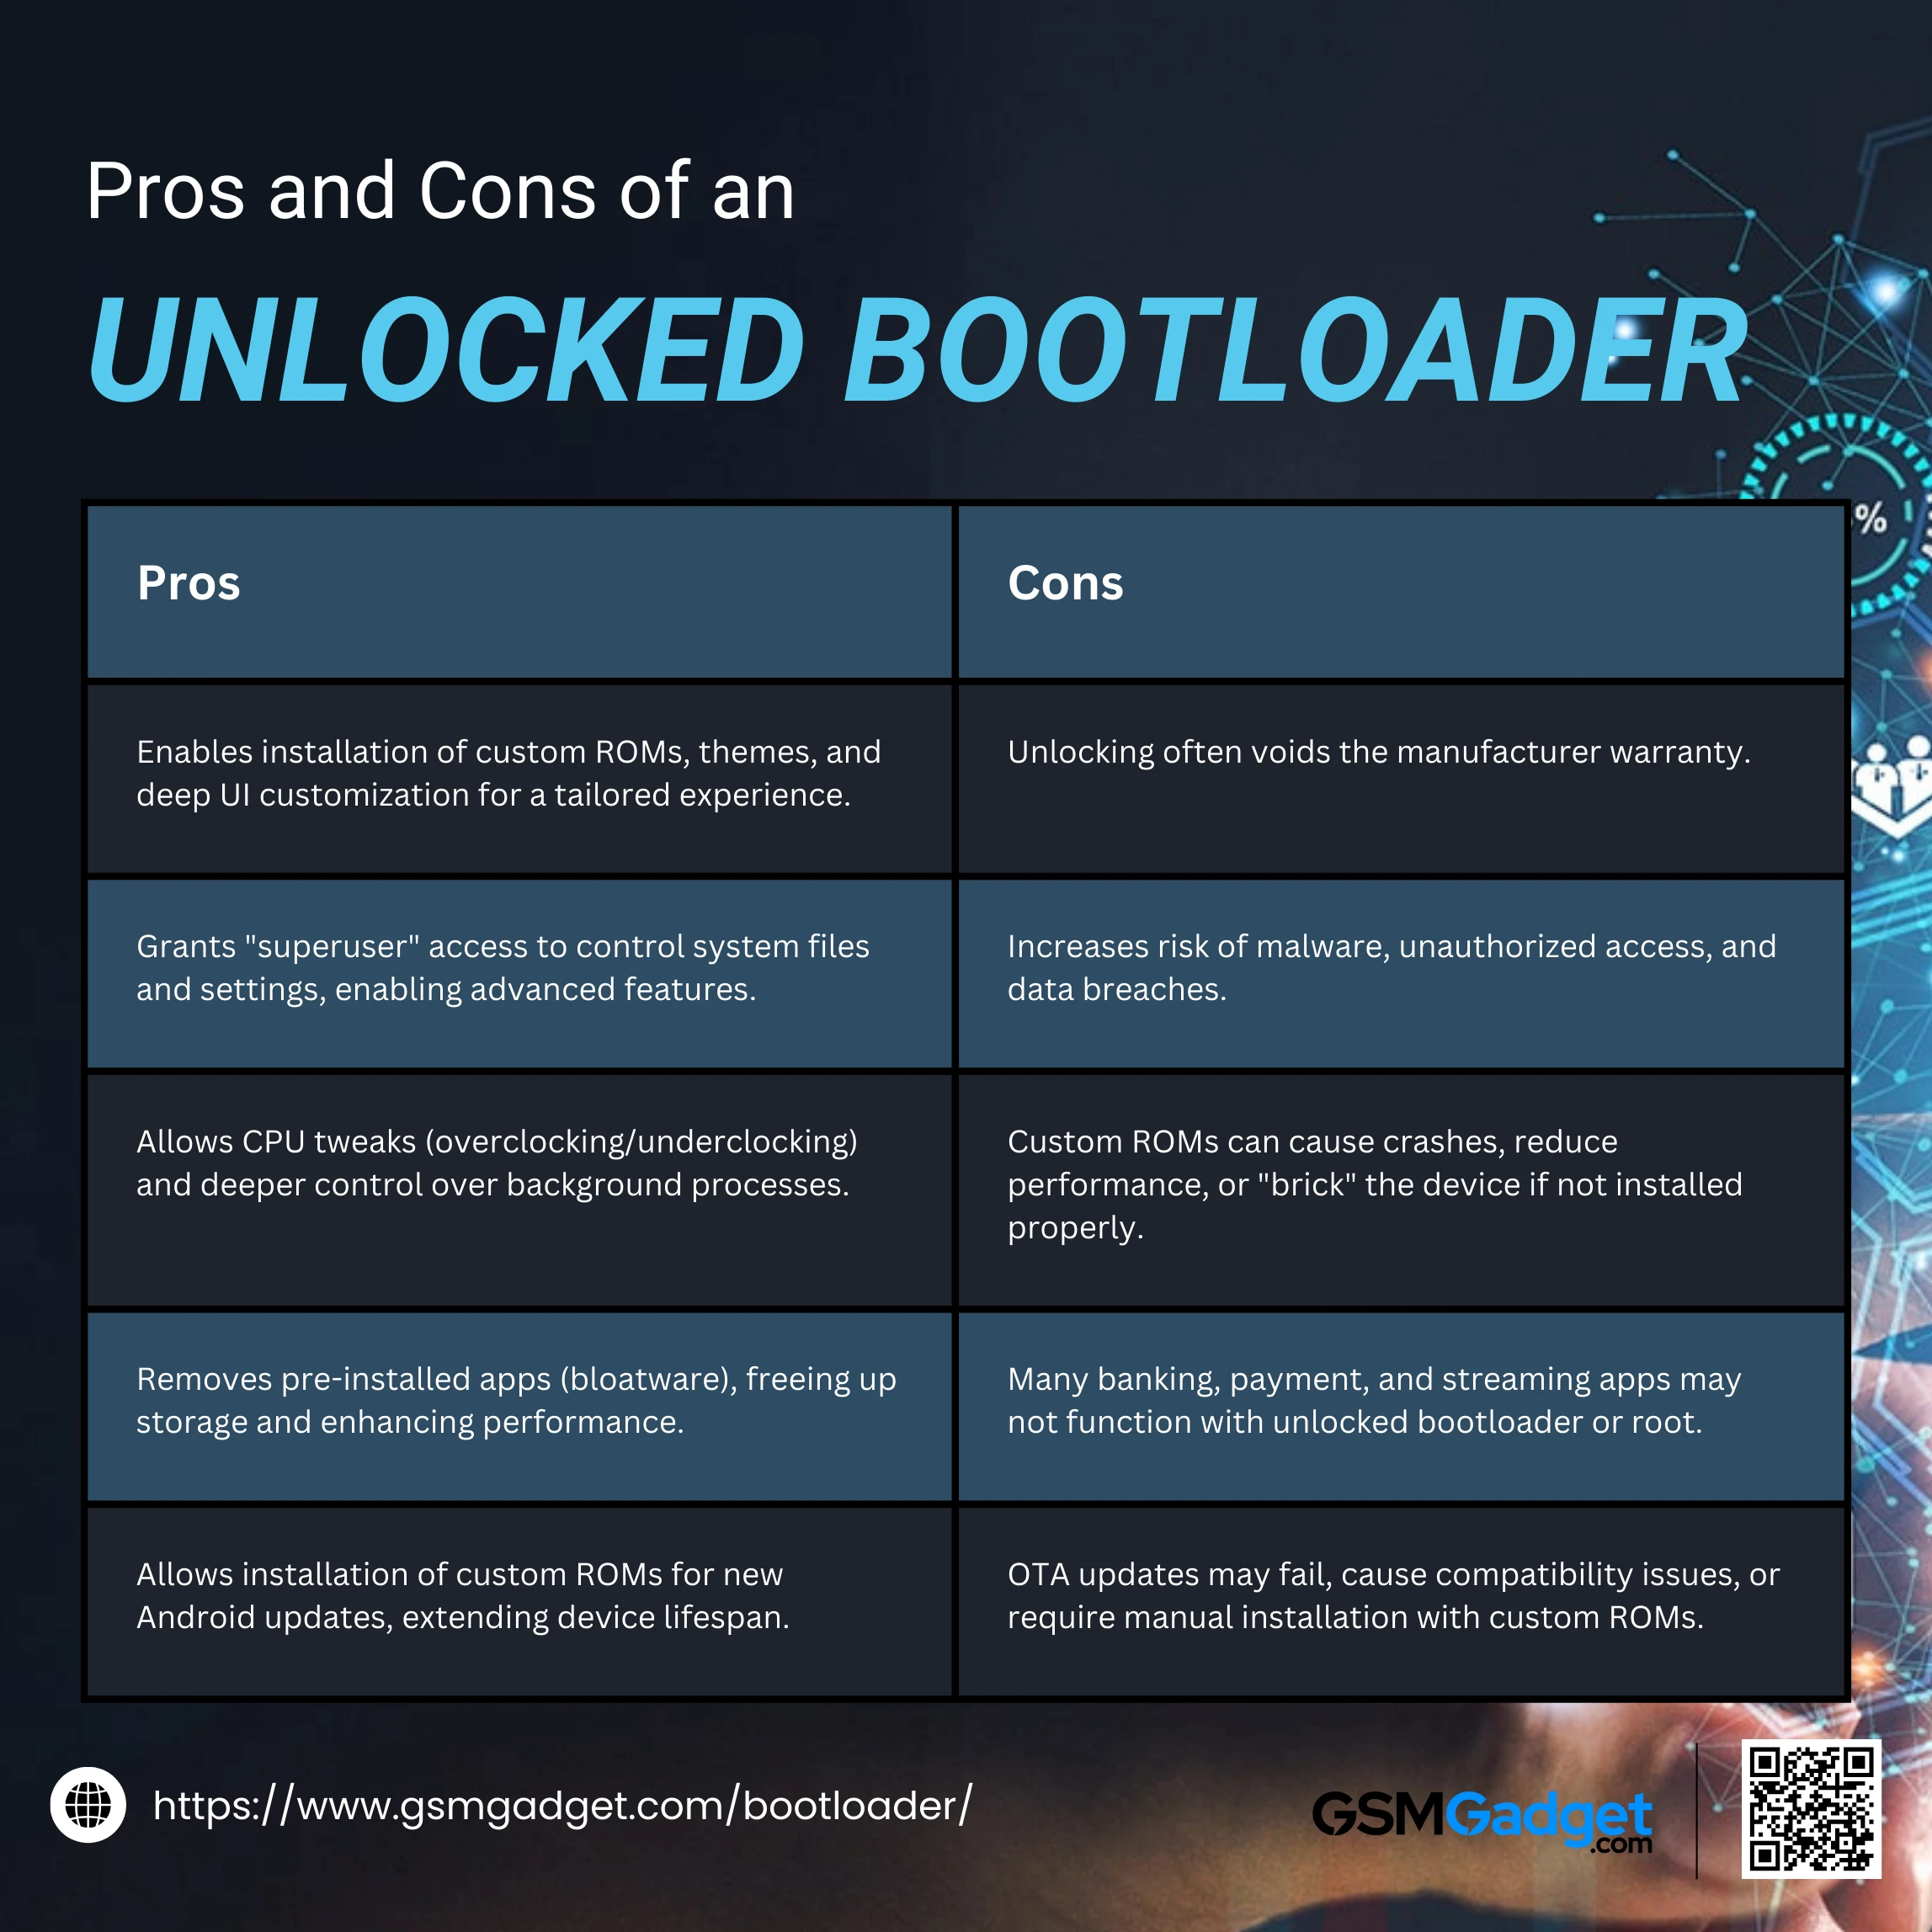
 Pros and Cons of an Unlocked Bootloader
Unlocking the bootloader of an Android device provides advanced users with the freedom to modify, customize, and optimize their device to suit their preferences. However, while an unlocked bootloader enables a wide range of possibilities—such as installing custom ROMs, gaining root access, and removing bloatware—it also introduces certain risks and drawbacks. Understanding the pros and cons of an unlocked bootloader is essential for deciding if it’s the right choice for you. Here’s a balanced look at the advantages and disadvantages:
Pros
1. Enhanced Customization Options
Unlocking the bootloader enables you to install custom ROMs, custom recoveries, and themes, allowing a high degree of customization. For instance, you can change the appearance of icons, animations, fonts, and interface elements, as well as access additional features not available in the stock OS. Custom ROMs, like LineageOS or Pixel Experience, often provide unique features, privacy tools, and performance tweaks, letting you shape the device experience to fit your lifestyle and preferences.
2. Access to Root and Advanced Permissions
Rooting gives you “superuser” access, allowing control over system files and settings that are typically restricted. With root access, you can install specialized apps, automate tasks, and make system-level changes. For example, you can use apps like Titanium Backup to create full backups, Greenify to optimize battery usage, or Tasker to automate actions based on conditions. Root access effectively opens the door to advanced features and modifications, giving you control beyond what standard users can access.
3. Performance and Battery Optimization
An unlocked bootloader allows for CPU modifications such as overclocking or underclocking, helping you optimize performance for specific tasks. Overclocking increases CPU speed for improved performance in demanding applications, while underclocking conserves battery life during lighter usage. Additionally, root access enables deeper control over background processes, allowing you to limit resource usage by restricting unnecessary apps, reducing system load, and maximizing efficiency based on your specific needs.
4. Freedom from Bloatware
Pre-installed apps, known as bloatware, are often included by manufacturers and can consume storage space, drain the battery, and slow down performance. With root access on an unlocked bootloader, you can remove these apps permanently, freeing up storage and reducing background activity. This results in a cleaner and more responsive device, allowing you to install only the apps you genuinely use and improving the overall user experience.
5. Extending Device Life
Many Android devices stop receiving official updates after a few years, which can leave them vulnerable to security risks and outdated features. By unlocking the bootloader, you can install custom ROMs that bring newer versions of Android, complete with recent features and security updates, to your older device. This extends its useful life, allowing you to keep using your device with a modern OS and improved security, even when the manufacturer has discontinued support.
Cons
1.Voided Warranty
Most manufacturers void the warranty if you unlock the bootloader, as it allows for modifications that could cause hardware or software issues outside their control. This means that if the device develops a fault after unlocking, the manufacturer may refuse to cover repairs or support under warranty. For newer devices, this risk could result in high repair costs, as you would need to pay out of pocket if anything goes wrong with the hardware or software.
2. Increased Security Risks
An unlocked bootloader removes some of the built-in security features designed to protect the OS from unauthorized modifications. Without these protections, the device is more susceptible to malware, data breaches, and unauthorized access. Malicious apps or users could exploit the unlocked bootloader to install harmful software or access sensitive data. For users who store personal or work information on their devices, this increased vulnerability can pose a significant risk.
3. Potential for System Instability
Custom ROMs and system tweaks often come with the risk of instability. Modified software may lead to frequent crashes, reduced performance, or battery drain. Additionally, installing ROMs or making configuration changes can sometimes result in a “bricked” device—meaning it’s unable to boot up or function properly. While some of these issues are reversible, they often require technical knowledge to resolve and may leave the device unusable if errors occur during installation.
4. App Compatibility Issues
Many banking, payment, and streaming apps may detect an unlocked bootloader or root access and refuse to function. For example, apps like Google Pay, Netflix, and certain banking apps may not work if they identify security risks associated with an unlocked device. This can be frustrating for users who rely on these apps daily, as they may lose access to essential services and may need to find workarounds to restore app functionality.
5. Challenges with OTA Updates
Official over-the-air (OTA) updates often encounter issues on devices with unlocked bootloaders or custom ROMs. These updates may fail to install, or if they do install, they could cause compatibility issues with the modified software, resulting in glitches or lost customizations. Missing OTA updates can leave the device without important security patches or feature improvements, requiring manual updates or a complete reinstallation of the custom ROM to stay current.
Conclusion
Re-locking the bootloader can be a valuable step for users who want to restore their Android device’s original security protections, enhance stability, or regain eligibility for warranty support. While an unlocked bootloader offers a world of customization, it also comes with security risks and potential compatibility issues. Re-locking the bootloader effectively returns the device to its factory state, enabling the full security and functionality intended by the manufacturer. By following the steps carefully—backing up data, restoring the stock OS, and issuing the re-locking command in Fastboot mode—users can ensure a smooth transition back to a secure, locked state. Whether you’re securing your device for daily use or preparing to sell it, re-locking the bootloader provides peace of mind and a fresh start for your Android experience.
