Screen recording is a technology that captures all activities displayed on a computer or mobile device screen, creating a video file that can include both visual and auditory information. This versatile tool is widely used for various purposes such as creating tutorials, recording game sessions, capturing webinars, and more. Screen recording is particularly useful for demonstrating workflows, providing visual feedback, and documenting technical issues, making it an indispensable tool for educators, content creators, and professionals alike. Users can choose from a variety of screen recording tools, including native options like QuickTime Player for Mac and Xbox Game Bar for Windows, as well as third-party applications such as OBS Studio and Descript, each offering unique features and capabilities to enhance the screen recording experience.
Native Tools for Screen Recording on Android
Native tools for screen recording on Android devices have become increasingly accessible and user-friendly, especially with the introduction of Android 11. The built-in screen recorder can be accessed through the Quick Settings panel by swiping down from the top of the screen and selecting the “Screen Record” icon. Users can customize their recordings by choosing to include audio from the device, microphone, or both, and can also show touches on the screen for better instructional videos. Additionally, some Android devices, such as those from Samsung, offer enhanced features like drawing on the screen and using the front-facing camera during recordings. This native functionality eliminates the need for third-party apps and provides a seamless way to capture high-quality screen recordings directly on your Android device.
1. Built-in Screen Recorder
The built-in screen recording feature was officially introduced in Android 11. However, some manufacturers like Samsung, LG, and OnePlus have included their own screen recording options in earlier versions, such as Android 9 (Pie) and Android. Steps to Access and Use the Built-in Screen Recorder
- Open Quick Settings: Swipe down from the top of your screen to open the Quick Settings panel. If you don’t see the screen recording option immediately, you may need to swipe right to find it or tap the pencil icon to edit and add the Screen Record button.
- Locate and Activate the Screen Record Button: Tap the “Screen Record” icon. You may need to grant permissions for the device to record the screen and audio.
- Start and Stop Recording: After tapping the Screen Record button, choose whether to record audio and show touches on the screen. Tap “Start” to begin recording. A countdown will appear before the recording starts. To stop recording, swipe down from the top of the screen and tap the “Stop” button in the notification panel.
- Save and Locate the Recorded Video: Once you stop the recording, the video is automatically saved to your device. You can find it in the Movies folder of your Google Photos app or your device’s gallery.
Pros and Cons of Using the Built-in Screen Recorder
Pros:
- No Need for Third-Party Apps: The built-in screen recorder eliminates the need to download potentially unsafe third-party apps.
- Ease of Use: It’s easily accessible through the Quick Settings panel, making it convenient for quick recordings.
- Customization Options: Users can choose to record audio from the device, microphone, or both, and show screen touches, which is useful for tutorials.
Cons:
- Limited Features: Compared to some third-party apps, the built-in screen recorder may lack advanced features like extensive editing tools and live streaming capabilities.
- Performance Issues: On some devices, using the screen recorder can cause performance issues, such as lag or overheating.
- Compatibility: The built-in screen recorder is only available on Android 11 and later, leaving users with older versions dependent on third-party solutions.
2. Using Google Play Games
Google Play Games offers a convenient way to record your gameplay directly from the app, making it an excellent option for gamers who want to share their experiences or create content. This feature is integrated into the app, providing a seamless recording experience without the need for additional software. Steps to Record Gameplay:
- Open Google Play Games App: Launch the Google Play Games app on your Android device. If you don’t have it installed, you can download it from the Google Play Store.
- Select Game and Choose the Record Option: Navigate to the game you want to record. Tap on the game, and you will see a “Record” button next to the “Play” button. Tap the “Record” button to proceed.
- Start and Stop Recording: After selecting the recording option, you will be prompted to choose the video quality (720p or 480p). Once you select the quality, tap “Launch” to start the game and begin recording. A floating bubble with recording controls will appear on the screen. To stop recording, tap the floating bubble and then tap the stop button.
- Save and Share the Recorded Video: Once you stop the recording, the video will be saved automatically to your device. You can access it through the Google Play Games app or your device’s gallery. From there, you can share the recorded video directly to social media platforms or messaging apps.
Pros and Cons of Using Google Play Games for Screen Recording
Pros:
- Integrated Solution: No need for third-party apps, as the recording feature is built into the Google Play Games app.
- Ease of Use: Simple and intuitive interface, making it easy to start and stop recordings.
- Quality Options: Allows you to choose between different video quality settings (720p or 480p), giving you control over the file size and quality.
Cons:
- Limited to Games: This feature is specifically designed for recording gameplay and may not be suitable for other types of screen recording.
- Performance Impact: Recording gameplay can impact the performance of the game, especially on lower-end devices.
- Basic Editing: The app offers limited editing capabilities, so you may need additional software for more advanced editing needs.
Third-Party Apps for Screen Recording on Android
Screen recording on Android devices has become increasingly essential for various purposes, from creating tutorials and recording gameplay to troubleshooting and sharing content. While Android offers a built-in screen recording feature starting from Android 11, third-party apps provide enhanced functionalities and customization options. Popular apps like AZ Screen Recorder, XRecorder, and Mobizen Screen Recorder offer features such as high-resolution recording, audio capture, and built-in video editing tools, making them ideal for users seeking more control and flexibility in their screen recording endeavors.
1. AZ Screen Recorder
AZ Screen Recorder is a popular and versatile screen recording app for Android devices. It offers a wide range of features, including high-definition screen recording, the ability to pause and resume recordings, and built-in editing tools. Users can also record audio from the microphone, capture their face using the front camera, and even create GIFs from their recordings. The app supports live streaming and includes a live drawing tool, allowing users to annotate their recordings in real-time. Steps to Use AZ Screen Recorder:
- Install the App from Google Play Store: Download and install AZ Screen Recorder from the Google Play Store. Ensure you grant all necessary permissions for the app to function properly.
- Set Up Recording Preferences: Open the app, and you will see an overlay with four prominent buttons. Tap the gear icon to open the settings menu. Here, you can configure various settings such as video resolution, frame rate, and bit rate to suit your recording needs.
- Start and Stop Recording: To begin recording, tap the red record button in the AZ overlay. The recording will start immediately, and you can continue using your device as usual. To stop recording, pull down the notification shade and tap the stop button in the AZ notification.
- Edit and Share the Recorded Video: After stopping the recording, you can access the recorded video through the AZ Screen Recorder app or your device’s gallery. The app provides basic editing tools, such as trimming and adding music. Once edited, you can share the video directly to social media platforms or save it to your device.
Pros and Cons of AZ Screen Recorder
Pros:
- High-Quality Recording: Offers high-definition recording with customizable settings for resolution, frame rate, and bit rate.
- User-Friendly Interface: Easy to use with an intuitive overlay and straightforward controls.
- Additional Features: Includes live streaming, front camera recording, and a live drawing tool, making it versatile for various recording needs.
Cons:
- Performance Impact: Recording high-definition videos can be resource-intensive and may affect device performance, especially on lower-end devices.
- Limited Advanced Editing: While the app offers basic editing tools, more advanced editing requires additional software.
- In-App Purchases: Some features are locked behind in-app purchases, which may be a drawback for users seeking a completely free solution.
2. Mobizen Screen Recorder
Mobizen Screen Recorder is a popular third-party app available on the Google Play Store that offers advanced screen recording features not typically found in native tools. Steps to Use Mobizen Screen Recorder:
- Install the App: Download and install Mobizen Screen Recorder from the Google Play Store.
- Set Up Recording Preferences: Open the app and configure your recording settings, such as resolution, frame rate, and audio source.
- Start and Stop Recording: Tap the floating Air Circle to start recording. Tap it again to stop.
- Edit and Share the Video: Use the built-in editing tools to refine your video. Once edited, you can share it directly from the app.
Pros and Cons of Mobizen Screen Recorder
Pros:
- High-Quality Output: Offers superior video quality compared to many native tools.
- Comprehensive Editing: Includes a wide range of editing features.
- User-Friendly Interface: Easy to navigate and use.
- No Watermark: Clean Mode allows for professional recordings without watermarks.
Cons:
- Ads in Free Version: The free version includes ads, which can be intrusive.
- Resource Intensive: Can consume significant system resources, potentially slowing down your device.
- Requires Permissions: Needs various permissions, which might be a concern for privacy-conscious users.
3. DU Recorder
DU Recorder is a popular third-party app available on the Google Play Store that offers advanced screen recording features beyond what native tools typically provide.
Steps to Use DU Recorder
- Install the App: Download and install DU Recorder from the Google Play Store.
- Set Up Recording Preferences: Open the app and configure your recording settings, such as resolution, frame rate, and audio source.
- Start and Stop Recording: Tap the floating button to start recording. Tap it again to stop.
- Edit and Share the Video: Use the built-in editing tools to refine your video. Once edited, you can share it directly from the app.
Pros and Cons of DU Recorder
Pros:
- High-Quality Video: Supports full HD resolution, which is great for capturing gameplay or screencasts.
- Intuitive Interface: Easy to navigate and use.
- No Watermarks: Does not add watermarks to recorded videos.
- Unlimited Recording: No time limits for recording sessions.
Cons:
- Ads in Free Version: The free version includes ads, which can be intrusive.
- Basic Editing Features: Lacks advanced editing tools found in some other screen recorders.
- In-App Purchases: Some features are only available through in-app purchases.
4. XRecorder
XRecorder is a versatile and user-friendly screen recording app designed for Android devices. Developed by InShot Inc., this free application allows users to effortlessly capture smooth and clear screen videos, take screenshots, and even live stream content. With a simple tap on the floating button, you can start recording high-definition videos, making it ideal for capturing gameplay, tutorials, video calls, and more. XRecorder also offers customizable settings such as resolution, frame rate, and audio sources, ensuring that users can tailor their recordings to their specific needs. Additionally, the app includes basic video editing tools, enabling users to trim, merge, and enhance their recordings directly within the app, without the need for external software. Whether you’re a gamer, educator, or content creator, XRecorder provides a comprehensive solution for all your screen recording needs. Steps to Use XRecorder to record screen
- Download and install XRecorder from the Google Play Store.
- Open the XRecorder app and grant necessary permissions for screen recording, audio recording, and storage access.
- Tap on the floating window icon that appears on your screen.
- Drag the floating window to any position you want or hide it if not needed.
- Tap on the “Record” button in the floating window to start recording your screen.
- Choose your desired video quality, resolution, frame rate, and bit rate before recording.
- Enable or disable internal audio recording, facecam, and brush tools as needed.
- To stop recording, tap on the stop button in the floating window or swipe down the notification panel and tap the stop button.
- Access your recorded videos by tapping on the XRecorder icon and navigating to the home screen of the app.
- Edit your recorded videos using the built-in video editor to trim, adjust speeds, add music and text, or change the aspect ratio.
- Share your recorded videos directly from the app to platforms like YouTube, Instagram, Twitter, IGTV, and Facebook.
Comparison of Native vs. Third-Party Screen Recording Tools
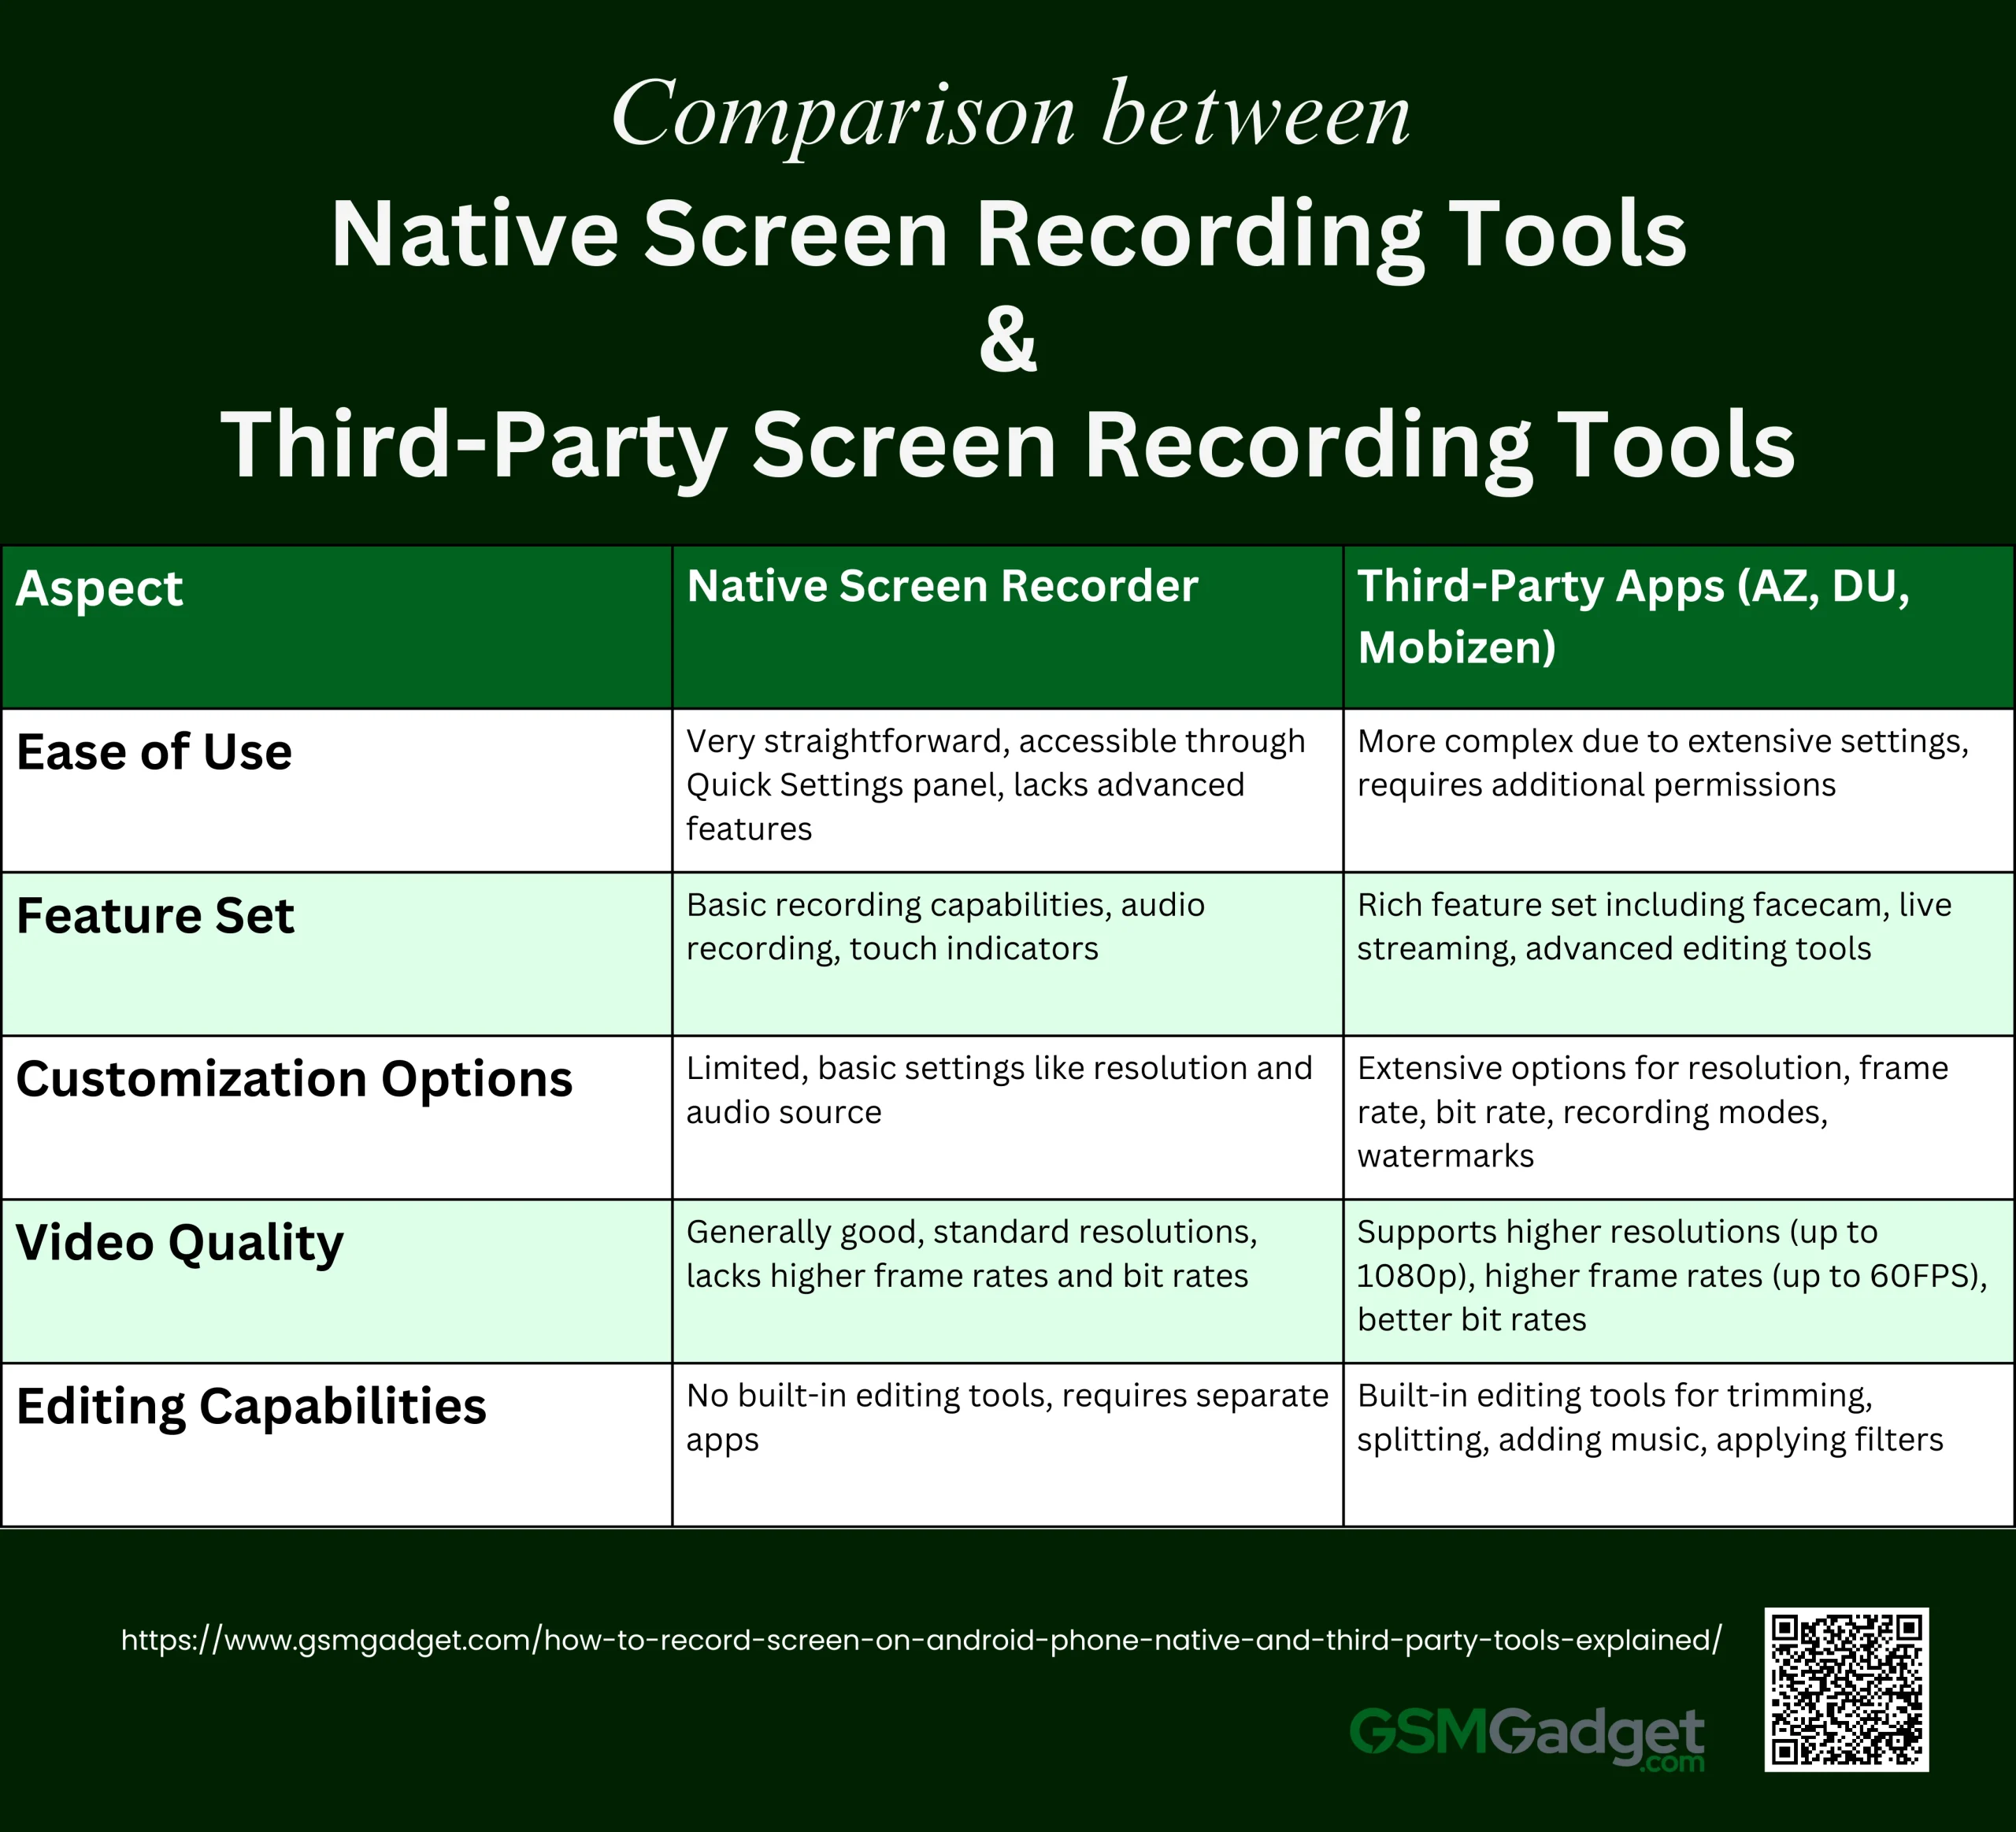
| Aspect | Native Screen Recorder | Third-Party Apps (AZ, DU, Mobizen, ) |
| Ease of Use | Very straightforward, accessible through Quick Settings panel, lacks advanced features | More complex due to extensive settings, requires additional permissions |
| Feature Set | Basic recording capabilities, audio recording, touch indicators | Rich feature set including facecam, live streaming, advanced editing tools |
| Customization Options | Limited, basic settings like resolution and audio source | Extensive options for resolution, frame rate, bit rate, recording modes, watermarks |
| Video Quality | Generally good, standard resolutions, lacks higher frame rates and bit rates | Supports higher resolutions (up to 1080p), higher frame rates (up to 60FPS), better bit rates |
| Editing Capabilities | No built-in editing tools, requires separate apps | Built-in editing tools for trimming, splitting, adding music, applying filters |
 Recommendations Based on User Needs
- For Basic Recording: If you need to record your screen occasionally and don’t require advanced features, the native screen recorder is sufficient. It’s easy to use and readily available on most modern Android devices.
- For Advanced Recording: For users who need advanced features like high-quality recording, facecam, live streaming, and extensive editing tools, third-party apps like Mobizen and InShot Screen Recorder are recommended. These apps provide a wide range of features and customization options that cater to more demanding recording needs.
Tips and Best Practices for Screen Recording: Preparation, Optimization, and Sharing
When preparing for screen recording, ensure you have sufficient storage space as screen recordings can take up a lot of space, close unnecessary apps to avoid lag and ensure a smoother recording experience, and enable Do Not Disturb to prevent interruptions from notifications and calls during recording. Optimize settings by choosing the right resolution and frame rate, with higher resolutions and frame rates better for gameplay, while lower settings might suffice for tutorials. Also, test audio settings to ensure that your microphone and system audio settings are clear and at the right levels. For editing and sharing, use built-in editors such as AZ Screen Recorder and XRecorder which offer basic editing tools to trim and enhance your videos, and most apps allow you to export recordings directly to social media or cloud storage, making sharing easy and efficient.